|
|
|
HTML - Hyper Text Markup Language
HTML stands for Hyper Text Markup Language. HTML is not a programming language like C, C++ or Java but a markup language used to create webpages that can be displayed by a browser. Using HTML, one can create webpages with colours, formatting (bold, italic, colours etc.), display data in tables, lists, add images, create forms, buttons and many more.
UNIT I CONTENTS
History of Internet & WWW, HTML Protocols, HTML Introduction, HTML Basic Tags, HTML Lists, HTML Tables, HTML Images, HTML Forms,
HTML Frames, HTML Links & Navigation, HTML Image Maps
History of Internet & World Wide Web
- HTML was developed during 1980's by Tim Berners-Lee at CERN, the European Center for particle physics to share documents.
- The US Super computing center NCSA developed a browser named Mosaic in which HTML was used and became popular later.
- Mosaic in no longer in use now but most of the browsers have used the features & functionality from this browser.
- HTML was developed based on SGML (Standard Generalized Mark-up Language), a internationally accepted method for marking up text into structural units such as paragraphs, lists, headings, tables etc.
- SGML is initially designed to share large project documents in government, law and industry.
- HTML derived from SGML is a markup language that web browsers use to interpret and compose text, images and other material into visual or audible web pages.
- Internet and World Wide Web are not the same. WWW (or simply Web) is a global information medium that can be accessed using computers connected to Internet. Internet is large network of computers connected through out the world where as the Web is a service that operates over internet like like e-mail, news, search.
- HTML Standards / recommendations are created by a group of interested organizations and individuals called W3C (World Wide Web Consortium). The three official HTML standards released so far are HTML 2.0 (released in 1994), HTML 3.2 (released in 1996) and HTML 4.0 (currently used & released in 1999). HTML 5 is still under progress but is also supported by few major browsers.
- HTML pages can be developed to display not only simple text but also complex multimedia data such as sound, moving images, graphics, Java applets etc.
More about this Topic:
HTML4 Protocols
A protocol is a set of rules that govern the exchange or transfer of data between 2 devices. For example, e-mail service requires coomunication between a client system and an e-mail server. Both the systems exchange information based on a variety of protocols. Some set of protocols supported by HTML 4 are HTTP, SMTP, POP3, MIME and IMAP.
HTTP - HYPER TEXT TRANSFER PROTOCOL
- HTTP stands for Hyper Text Transfer Protocol which is a TCP/IP based communication protocol used to deliver all files and data including HTML files, images, query results, or anything else on the web.
- A browsers works as a HTTP client because it sends request to a HTTP server called Web Server. The web server then sends a response back to the client.
- The standard and default port for HTTP server is 80 but can be changed to anyother port.
- HTTP is application level protocol that uses different request methods such as POST, GET, HEAD etc.
A simple example communication using HTTP:
More about HTTP:
SMTP - SIMPLE MAIL TRANSFER PROTOCOL
- The SMTP (Simple Mail Transfer Protocol) is used by the Mail Transfer Agent (MTA)(a software to transfer electronic mail messages from one computer to another) to deliver your email to the recepient.
- E-mail servers & MTAs use SMTP to send and receive e-mails where as client applications / programs use SMTP only to send emails but not to receive them.
- For receiving messages, the client applications usually use POP (Post Office Protocol) or IMAP (Internet Message Access Protocol) or a software such as MS Outlook to access their mail box accounts from a mail server.
- SMTP can transmit only pure text. It can not transmit binary data like images, audio or video files.
- SMTP uses the MIME protocol to send binary data across TCI/IP networks. The MIME protocol converts binary data to our text.
- Port number 25 is the most common port used by SMTP. But, port 587 is also used by mail clients to relay mail to any valid address. For example, Gmail allows submission of emails from programs using the SMTP protocol via port 587.
More about SMTP:
POP3 - POST OFFICE PROTOCOL 3
- Post Office Protocol 3 (POP3) protocol provides a simple and standardized way for users to access mail boxes and download messages to their computers.
- POP3 is used by email client software such as Microsoft Outlook, ThunderBird, Evolution (in Linux) to retrieve emails from a e-mail server (like Gmail, Rediff).
- If your email program uses POP, all your email in your mail box will be downloaded to your email client every time it connects to your email server.
- POP3 uses the port 110.
- POP3 is designed to work in offline mode.
More about POP3:
IMAP - INTERNET MESSAGE ACCESS PROTOCOL
- IMAP (Internet Message Access Protocol) is similar to POP3 that is used by e-mail clients to retrieve e-mails from their mail server.
- The main difference between IMAP & POP3 is that IMAP will not automatically download all the mails when connected to server where as POP3 downloads all e-mails as soon as your email client is connected to the mail server.
- Using IMAP, you can select the e-mails of your interest and choose to download or delete them.
- As IMAP needs only small data to be transferred, it works perfect for slow internet connections compared to that of POP3.
- IMAP uses the port 143.
- POP3 emails reside in your local computers where as in IMAP, mails are stored in IMAP server itself that sends information about each message to the IMAP client.
- IMAP allows a client to read and manipulate messages in the mailbox.
More about IMAP:
MIME - MULTIPURPOSE INTERNET MAIL EXTENSION
- MIME (multipurpose Internet Mail Extension) is also used to deliver e-mails.
- SMTP is used only to transmit text messages. MIME extends the format of messages that SMTP can send.
- MIME support the following format of emails:
- ASCII Text (SMTP allows this)
- Non-ASCII Text
- Non-Text attachments like images, videos, files etc.
- Message body with multiple parts
- HTML emails
- Header information in non-ASCII character sets
- All our email communications now a days are usually transmitted through SMTP in MIME format.
- The MIME protocol converts binary data to our text and sends it via SMTP.
More about MIME:
HTML Introduction
- HTML stands for Hyper Text Mark-up Language. It is used to create webpages. In other words, HTML documents are also called Web pages.
- Hypertext is the text that is displayed on a computer or other electronic device with hyperlinks (references) to other text. Hypertext is an easy & flexible format to share information over internet.
- Apart from text, hypertext may contain tables, images, lists etc.
- HTML is not a programming language like C, C++ or Java.
- It is a mark-up language. A markup language is a set of mark-up tags. The purpose of these markup tags is to describe the content of a page.
- The markup tags used in HTML are called HTML tags. HTML tags are keywords surrounded by Angle Brackets (Between < and > symbols) such as <HTML>, <B>.
- Almost all tags (except few) comes with an end tag (same as start tag but with a / symbol before the tagname). These HTML tags should be used in pairs such as <b> and </b>. Example, <b> WT COURSE </b> that displays as WT COURSE
- HTML tags are case-insensitive. <HTML>, <html> and <HtMl> are the same. W3C recommends tags to be lower-case.
- Steps to create & view HTML documents:
- Open NotePad or any Text Editor and Write HTML Code in it.
- Save the file with .html / .htm extension.
- Open the HTML document in a browser(Internet Explorer, Firefox, Chrome etc.)to view the webpage.
- To make changes, edit the code in text editor & save it.
- Refresh the page to view the changes.
- The Basic Structure of a HTML code is as follows:
HTML Basic Tags
- HTML tags can be used formatting text (bold, italic, color, size, etc.); create tables, lists, forms; add images, colors, hyperlinks, headings, paragraphs,etc., to webpages.
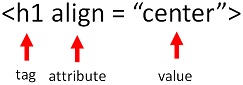
- HTML Elements: An HTML Element is everything between the start and end tag including the text.
For example, "<P>This is paragraph</P>" is a HTML Element where <P> is the Start Tag, 'This is paragraph' is the Element Content and </P> is the End Tag.
- HTML Attributes: Most HTML elements have additional property called Attribute.
For example, <BODY bgcolor='red'>. The tag 'BODY' has an attribute named 'bgcolor' with value 'red'.
- Nested HTML Elements: HTML elements can be nested i.e., one HTML element can contain another HTML element in it.
For example, <P> <B><U> The is NESTED. </U></B></P>. Make sure you close the tags in the reverse order of their oepning i.e., the tag opened first should be closed last.
- HTML Comments: HTML comments can be inserted in HTML code for better understanding & readability of the code. <!-- This is commented --> is a HTML comment. Comments are ignored by the browser and are not displayed in the webpage.
SOME BASIC TAGS:
| Tag | Usage | Description |
|---|
Heading Tags - <H1>, <H2>, <H3>,
<H4>, <H5>, and <H6> | <H1> Heading </H1>
<H4> Heading </H4> | Used for creating headings. H1 is the Highest & H6 is the smallest heading. |
| Paragraph - <P> | <P>This is a paragraph text</P>. | Used for displaying text in a paragraph. |
| Bold - <B> | <B>This Text is Bold</B> | Used for making the text bold. The output would be as follows: This Text is Bold |
| Italic - <I> | <I>This Text is Italic</I> | Used for making the text italic. The output would be as follows: This Text is Italic |
| Underline - <U> | <U>This Text is Underlined</U> | Used for underlining the text. The output would be as follows: This Text is Underlined |
| Line Break - <BR> | This is first Line.<BR>This is second line. | Used for giving line break. Text following <BR> tag will be displayed in next line. Note: BR has no close tag and hence is also called empty element as it does not enclose any content. |
| Horizontal Line - <HR> | This is above the line.</HR>This is below the line. | Used for giving a horizontal line on the webpage. This is used to separate content. |
| HTML Comments - <!-- COMMENT --> | <!-- The following section is a section heading --> | Comments can be written in HTML document to ensure readability and understanding. The text written between <!-- and --> are ignored by the browser and are not displayed. |
| Address - <address> | <address>
Suresh Mudunuri<BR>
Associate Professor,<BR>
Dept. of IT, SRKREC Bhimavaram<BR>
Phone: 9866600002
</address> | Used to display the contact information of a person such as address, telephone numbers etc. |
| Code - <code> | <code>
#include <stdio.h>
main()
{
printf("Hello");
}
</code> | Used to display a piece of computer code such as C Program etc. |
| Strike Through - <DEL> | <DEL>Stiked Off </DEL>. | Used for striking off a text. The ouput would be as follows: Striked Off |
| Subscript - <sub> | X<sub>n</sub> | Used for making text as a subscript. The ouput would be as follows: xn |
| Superscript - <sup> | X<sup>n</sup> | Used for making text as a superscript. The ouput would be as follows: xn |
DEMO - HTML BASIC TAGS
More about HTML Basic Tags:
HTML Lists
- HTML can be used to display content in the form of lists such as bulleted list, numbered lines etc.
- There are 3 types of Lists in HTML - Ordered, Un-ordered and Definition Lists.
- Ordered Lists: An Ordered list in HTML can be created using <OL> & <LI> tags. For example, a list with numbers or alphabets.
- Un-ordered Lists: An un-ordered list in HTML can be created using <UL> & <LI> tags. For example, bulleted list.
- Definition Lists: An Definition list in HTML can be created using <DL>, <DT> & <DD>tags. For example, dictionary like list.
Types of Lists:
| List Type | Usage | Output |
|---|
| Ordered List |
<OL>
<LI> Bhimavaram</LI>
<LI> Akuveedu </LI>
<LI> Kaikaluru</LI>
</OL> |
- Bhimavaram
- Akuveedu
- Kaikaluru
|
| Un-ordered List |
<UL>
<LI> Bhimavaram</LI>
<LI> Akuveedu </LI>
<LI> Kaikaluru</LI>
</UL> |
- Bhimavaram
- Akuveedu
- Kaikaluru
|
| Definition List |
<DL>
<DT> Apple</DT>
<DD> Its a fruit, usually red in color. </DD>
<DT> Cricket</DT>
<DD> Its a game played by 11 members in a team.</DD>
</DL> |
- Apple
- Its a fruit, usually red in color.
- Cricket
- Its a game played by 11 members in a team.
|
- <UL> Attributes: Inorder to change the bullet type, an attribute named 'type' exists. The values of the attribute 'type' can be 'square', 'disc' or 'circle'. Default: disc.
- <OL> Attributes: An Ordered list has 2 attributes 'type' & 'start'. Type can be 'A' or 'a'(for alphabets); 'I' or 'i' (for roman letters). Default is numbered list. 'start' attribute can be used to indicate the beginning value of the list. For example, <ol type='A' start='5'> will display the list in alphabets starting from E.
DEMO - HTML LISTS
HTML TABLES
- Text in webpages can also be organised and displayed in the form of tables using <TABLE> tag.
- Table in HTML are a set of rows created by <TR> (Table Row) Tag. Each row contains certain number of cells created using < TD > (Table Data) tag.
- Any data in the table should be inside the <TD> tags. The data can be plain text, images, lists, hyperlinks or even other tables.
- The following is the syntax of a normal table: (2 X 2 Table)
TABLE CODE:
The above code will display as follows:
| Cell 1 | Cell 2 |
| Cell 3 | Cell 4 |
- TH Tag: The headings of the table can be created using <TH> tags in place of <TD> tags. The <TH> tag will highlight the text by making it bold and centered.
- caption Tag: <caption> tag immediately after the table open tag will display the text above the table as a caption.
- THEAD, TFOOT and TBODY Tags: The HTML table can be divided into 3 different sections head, body and footer. The first row (<TR> Element) is usually surrounded by <THEAD> element, the last row with <TFOOT> element and the remaining body with <TBODY> element.
The sample usage of these tags can be found here.
- colgroup & col Tag: <colgroup> & <col> tags are used to apply an attribute to more than one column. Example usage can be found here
Table Attributes:
| Attribute - Tag | Usage | Descrption |
| border - <TABLE> |
<TABLE border='3'> |
Eg. <TABLE border='0'> creates a table with no border. A positive value defines the thickness of the border. The greater the number, the more thick the border will be. |
| width - <TABLE> |
<TABLE width='100%'> |
The value can be relative (%) or absolute (px). Eg. <TABLE width='75%'> creates a table that spans 75% of the horizontal space where as <TABLE width='350px'> will create a table with an exact width of 350px. |
| height - <TABLE> |
<TABLE height='100%'> |
Similar to width, the height value can be relative (%) or absolute (px). |
| align - <TD> |
<TD align='right'> |
Aligns the text in the cell horizontally. The values are 'left' / 'right' / 'center' |
| valign - <TD> |
<TD valign='top'> |
Aligns the text in the cell vertically. The values are 'top' / 'middle' / 'bottom'. One can also use this along with the align attribute. |
| cellpadding - <TABLE> |
<TABLE cellpadding='2'> |
Specifies the space between the text and the cell borders. cellpadding='0' will display the text very adjacent to the cell border where as a larger number gives more padding (space between text & border). |
| cellspacing - <TABLE> |
<TABLE cellspacing='2'> |
Specifies the space between two cells in a table. A larger number gives more space between two cells and the inner borders look thicker. |
| bgcolor - <TABLE> |
<TABLE bgcolor='#FF56ED'> |
Works similar to the bgcolor aatribute of body tag. This gives a background color to the table alone. |
| background - <TABLE> |
<TABLE background='sunset.gif'> |
Can be used to keep an image as a background to the table. |
| colspan - <TD> |
<TD colspan='3'> |
Will merge 3 columns towards right. We need to replace 3 TD elements with one TD |
| rowspan - <TD> |
<TD rowspan='2'> |
Will merge 2 cells vertically. The TD element will merge with the cell of below row. |
DEMO - HTML TABLES
HTML Images
- Images in Webpages can be inserted using <IMG> tag.
- <IMG> is an empty element as there is no close tag.
- 'SRC' Attribute: The important attribute of <IMG> tag is 'src' (Source URL / Path of the Image).
Sample Usage: <IMG src='vishnu.jpg'>
Output:

- 'ALT' Attribute: This specifies the alternate text to be displayed (in the place of image) if the image could not load. The alternative text is also displayed if the image takes time to load (due to slow internet connection, large image size etc.)
- 'HEIGHT' & 'WIDTH' Attributes: You can restrict the size of the image to be displayed by using the 'height' and 'width' attributes. Note that only the space allocated for the image in the webpage will be adjusted and it still takes the same time to load the image. Hence, it is adviced to use smaller images rather than using large images & adjusting the height & width attributes.
Sample Usage: <IMG src='vishnu.jpg' alt='Vishnu Institute of Technology' height='100px' width='100px' >
Output:
Note: The values of height & width attributes can also be relative. For example, <IMG src='vishnu.jpg' height='80%' width='80%' >
- 'ALIGN' Attribute: This attribute can be used to adjust the alignment of the images in line with the text. The possible values of the 'align' attribute are 'bottom', 'middle', 'top', 'left' and 'right'.
HTML Forms
- Uisng HTML, we can create forms in webpages (Application Form, Registration Forms etc.) that can pass information to the server.
- HTML Forms can contain input fields such as text fields, radio buttons, check boxs, buttons, drop-down lists and many more.
- Forms can be created using <FORM> tag and separate tags exist to create form input fields. The usual syntax of form can be as follows:
FORM CODE:
- Important Form Tags: Most of the input fields (Text Box, Radio Button, Checkbox, Password Box etc.) can be created using <INPUT> tag. Large Textbox (to input addresses and other text) can be created using <TEXTAREA> tag. Drop-down List can be created using <SELECT> AND <OPTION> tags.
- A HTML form consists of atleast one input field and one submit button between the FORM tags.
FORM FIELD TAGS:
FORM ATTRIBUTES:
HTML Frames
- Using Frames, we can display more than one web page in the window. The window can be divided into multiple frames so that each frame can display a separate page.
- With the addition of Cascading Style Sheets (CSS), the frames have become outdated and usage of frames in web development is strongly discouraged.
- Frames can be created using <FRAMESET> and <FRAME> tags.
FRAME CODE:
- 'FRAMESET' Tag: FRAMESET tag is the parent tag that defines the individual frames in it. FRAMESET tag attributes cols & rows that define the way the window should be divided into different frames.
- 'FRAME' Tag: FRAME tag is the actual tag defines what page to be loaded in the frame using the 'src' attribute.
- 'IFRAME' Tag: An unique tag that displays an inline frame. An inline frame is a frame embedded in another html document that display some content such as an advertisement, image or some other webpage in a small box. The usage is as follows:
<IFRAME src='adv.html' height='200px' width='400px' ></IFRAME>
FRAMESET & FRAME Attributes:
| Attribute - Tag | Usage | Descrption |
| border - <FRAMESET> |
<FRAMESET border='0'> |
Eg. <TABLE border='0'> creates the frames with no border. A positive value defines the width / thickness of the border. |
| frameborder - <FRAMESET> |
<FRAMESET frameborder='0'> |
'border' attribute defines the width of the border where as 'frameborder' just defines whether the frames should display the borders or not. The value can be 0 (no border) or 1 (have border). |
| src - <FRAME> |
<FRAME src='http://www.google.com'> |
'src' of frame defines the webpage that should be displayed in the frame. |
| cols - <FRAMESET> |
<FRAMESET cols='25%,30%,*'> |
'cols' attribute defines the number of vertical frames to be created and their widths. * indicates the remaining percentage. |
| rows - <FRAMESET> |
<FRAMESET rows='25%,75%'> |
'rows' attribute defines the number of horizontal frames to be created and their widths. * indicates the remaining percentage. |
| name - <FRAME> |
<FRAME name = 'frame1' src='page1.html'> |
Each frame can be named using the name attribute that can be used by the target attribute to display the content in that frame. |
| scrolling - <FRAME> |
<FRAME src='page1.html' scrolling = 'no' > |
Specifies whether scrollbars should be displayed in a frame or not. The values can be 0 (no scrollbars), 1(scrollbars displayed) and auto (displays when needed). |
| noresize - <FRAME> |
<FRAME src='page1.html' noresize='noresize'> |
Speicfies that the page is not resizable. The frame can not be expanded or dragged using the mouse pointer. |
HTML HyperLinks & Navigation
- A Hyperlink (or link) is a text or image when clicked on it takes you to a new document or to a particular section of the same document.
- Hyperlinks are very useful for navigation of different webpages of a website.
- Hyperlinks in HTML can be created using 'anchor' tag (<A> ).
- Hyperlink Syntax: <A href='URL'> Link Text </A>.
- Hyperlink Example: <A href='http://www.google.com'> Google Home Page </A> that displays as follows Google Home Page
- 'href' Attribute: The href (hyperlink reference) attribute of <A> tag is a mandatory attribute that is used to specify an URL / Document to which it is linked.
- 'target' Attribute: The 'target' attribute specifies where to open the linked document (URL). For example, target='_blank' will always open the document in a new blank browser window. This will open a new blank window every time you click on the link. If you specify a name inside the target (say target='window1'), it will first open a new window, name it as 'window1' and will always display the page in the same 'window1' window.
- If the 'target' attribute is not specified, the URL / Document will be opened in the same window.
- E-mail address are hyperlinked using 'mailto' option - <a href='mailto:suresh.mudunuri@gmail.com'>suresh.mudunuri@gmail.com</a> Output: suresh.mudunuri@gmail.com (This will connect to e-mail client software such as MS OutLook Express, Windows Live, Thunderbird etc., that are installed in our computer.)
- To make an image as a hyperlink, surround the image with the anchor tags. For example,
<A href='http://www.mcr.org.in' target='_blank' > <IMG src='bol.png' > </A> will output as follows:
 (Click on the image to open). (Click on the image to open).
Internal Hyperlinking:
- Internal Hyperlinking is the process of creating hyperlinks that point to a particular section of the same page or a different page.
- This can be done using the name attribute. The tags with name attribute are called named anchors (Example: <a name='sec1'> Section 1</a>).
- The process of creating internal hyperlink is done in 2 steps.
- First create a named anchor to a specific section of text in the document (Eg. name it as 'xyz') as follows:
<a name='xyz'> XYZ </a>
(This marks the section of this page as 'xyz').
- Secondly, you can link to this 'xyz' section using the anchor tag as follows:
<a href='#xyz'>Go To XYZ</a> (Clicking on this link will take you to the section xyz.)
- To link to a section (say 'xyz') of a separate page, we can do as follows:
<a href='page3.html#xyz'>Go To XYZ</a> (Clicking on this link will take you to the section xyz of page3.html.)
DEMO - HTML HYPERLINKS
HTML Image Maps
- Image map is an image in which some areas are clickable (hyperlinks to different locations). Instead of making the entire image as a single hyperlink, one can make a single image into an image map where you can map different areas as hyperlinks.
- Image maps are extremely useful if properly created but are painful if not mapped correctly.
- Image maps are created using <IMG>, <MAP> and <AREA> tags.
- To create an image map, follow the simple steps:
- Add an image to the page using <IMG> tag as usual. Also add an extra attribute usemap = '#someName' to the IMG tag. (The 'someName' in the usemap is the name given to the <MAP> element.)
Example: <img src='vishnu.jpg' usemap='#check'>
- Use the <MAP> element that maps various clickable areas for the image created. <MAP> contains <AREA> elements each pointing to a location. Specify a name to the MAP element using the name attribute.
Example: <map name='check'>
- Use as many <AREA> tags as you would like to create hyperlinks (using HREF attribute) that can be of different shapes (using SHAPE attribute) by specifying their co-ordinates using "COORDS" attribute.
Example: <area shape ="rect" coords ="43,149,131,160" href ="http://www.vishnu.edu.in">
IMAGE MAP CODE:
The output of the above code is as follows:
Click on the "V" part of the image that points to VIT website. The second area has mapped the purple V to the SVECW website.
- SHAPE Attribute: Defines the shape of the clickable area in the image. The possible values are rect (rectangular area) / circle (circular area)/ poly (any shape) / default (remaining area of the image).
- COORDS Attribute: Specifies the co-ordinates of the clickable area in the image. The possible values differ based on the shape used.
- RECT: 4 values - left, top, right, bottom
- CIRCLE: 3 values - Centre of X, Centre of Y, and the radius.
- POLY: n values - x1, y1, x2, y2, x3, y3 etc.
- DEFAULT: No Coordinates.
- There can be only one area of a map whose shape is default.
|
